Flipper Zero GPIO Guide , GPIO (General Purpose Input/Output) lets the Flipper Zero interact with physical electronic components. This is where many users hesitate because it sounds technical—but in reality, GPIO can be very simple and very safe when used correctly.
This guide explains exactly what GPIO does, how to start step by step, and what hardware add-ons you actually need (and which you don’t).
What GPIO on the Flipper Zero Is Used For
GPIO allows the Flipper Zero to:
Send simple electrical signals (output)
Read signals from sensors (input)
Control LEDs, buzzers, and relays (low power only)
Learn how electronics and logic work
Prototype very small projects
GPIO is for learning and experimentation, not for powering devices or bypassing hardware security.
Very Important Safety Rule (Read This First)
The Flipper Zero GPIO pins operate at low voltage and low current.
You must never:
Connect GPIO to mains electricity
Connect GPIO to high-power devices
Connect GPIO directly to motors or relays without protection
Guess pin connections
If you stay in the low-power learning zone, GPIO is completely safe.
What You Need to Use GPIO
Required:
Flipper Zero
Strongly recommended beginner kit:
Breadboard
Jumper wires (male-to-male)
Resistors (220Ω or 330Ω)
LEDs
(Optional) simple sensors (button, temperature, light)
You do not need:
Wi-Fi Dev Board
Soldering tools
Arduino or Raspberry Pi
External power supplies
A small electronics starter kit is ideal.
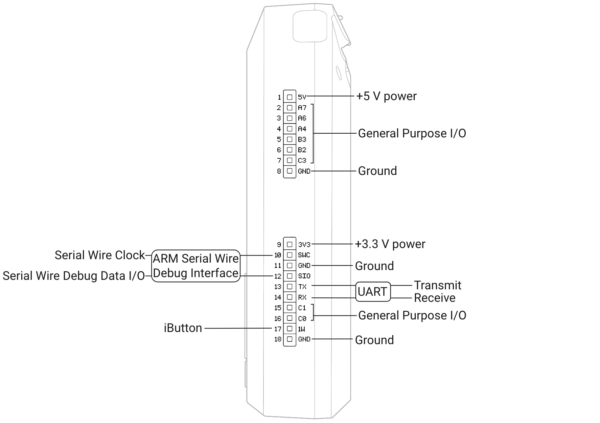
Where the GPIO Pins Are Located
The GPIO pins are on the top edge of the Flipper Zero.
They are labelled and include:
GND (Ground)
3.3V output
GPIO pins (numbered)
Always double-check pin labels before connecting anything.
Understanding GPIO in Plain English
Think of GPIO like this:
Output pin → Flipper sends a signal (ON/OFF)
Input pin → Flipper listens for a signal
That’s it. No magic, no hacking.
Beginner Project #1: Blink an LED (Best First Test)
This confirms GPIO works and teaches fundamentals.
What you need:
1 LED
1 resistor (220Ω or 330Ω)
2 jumper wires
Breadboard
Step-by-step:
- Place the LED on the breadboard
- Connect the LED’s long leg to a GPIO pin via the resistor
- Connect the LED’s short leg to GND
- Open GPIO or Tools → GPIO on the Flipper
- Set the chosen GPIO pin to Output
- Toggle the pin ON and OFF
Result:
The LED turns on and off.
If this works, your GPIO setup is correct.
Beginner Project #2: Read a Button Press (Input Test)
This teaches input signals.
What you need:
Push button
Resistor
Jumper wires
Concept:
When you press the button, the Flipper detects a signal change.
Step-by-step:
- Connect button to a GPIO input pin
- Connect other side to GND or 3.3V (depending on setup)
- Open GPIO input view
- Press the button
- Watch the input state change
This shows how sensors communicate.
What the GPIO Menu Does
Depending on firmware and installed tools, GPIO allows you to:
Configure pins as input or output
Toggle outputs manually
Monitor pin state
Run simple scripts
This is all done safely within firmware limits.
Common GPIO Beginner Mistakes (And Fixes)
“Nothing happens”
• Wrong pin selected
• Missing resistor
• LED reversed
• Pin set to input instead of output
“Flipper restarts or behaves oddly”
• Short circuit
• Incorrect wiring
Fix:
Power off, re-wire carefully, restart.
What GPIO CANNOT Do
GPIO cannot:
Power large devices
Drive motors directly
Bypass electronics security
Replace microcontrollers
Handle high voltage
If you need those, you move into Arduino or Pi territory.
Best Beginner GPIO Experiments
Once LEDs work, try:
Blink patterns
Multiple LEDs
Light sensors
Temperature sensors
Buzzers
Simple alarms
Each builds confidence.
When GPIO Is the Right Tool
GPIO is perfect when you want to:
Learn electronics basics
Understand inputs vs outputs
Prototype ideas
Teach hardware concepts
Add physical interaction to learning
It’s about understanding, not control.
When GPIO Is Not the Right Tool
If you want:
Complex automation
High-power control
Full projects with displays
Heavy programming
Use Arduino or Raspberry Pi instead.
Do You Need Extra GPIO Add-Ons?
Most users only need:
A small electronics starter kit (£10–£20)
Avoid buying advanced modules until you know why you need them.
Final Thoughts on GPIO
GPIO is where the Flipper Zero becomes a true learning platform. It teaches the fundamentals of electronics in a safe, controlled way. You don’t need coding skills or advanced tools—just curiosity and careful wiring.
Once you understand GPIO, you’ll also understand why modern hardware security is difficult to bypass.
Next in the Series
The next deep dive is:
Flipper Zero App Hub Guide: What to Install, What to Avoid, and How to Keep It Clean