
Before you start, make sure:
Your Flipper Zero is charged (ideally 50%+)
You have installed the Flipper mobile app
Your firmware is updated to the latest stable release
Your region is set correctly (important for Sub-GHz)
Navigation Basics (You’ll Use This Everywhere)
OK = select / confirm
Back = go back (hold 3–5 seconds to power off)
Up/Down/Left/Right = move through lists and options
Useful shortcuts:
Reboot: hold OK + Back
Power off: hold Back for 3–5 seconds
Hardware add-ons needed: none
Section 1: NFC (13.56 MHz) – Read and use NFC tags you own
What you can realistically do:
Read NFC tags and cards you own
Identify tag type
Save scans
Write to blank NFC tags (supported types)
Hardware add-ons needed:
None for basic reading/writing
Optional: extra blank NFC tags (NTAG213/215/216 are common for automation)
Step-by-step: Read an NFC tag
Open NFC
Choose Read
Place the NFC tag flat against the back of the Flipper
Hold still until it completes
Select Save if you want to store it
Step-by-step: Write a simple NFC tag (for your own automation tags)
Open NFC
Choose Saved
Select a saved tag (or create a new one if supported)
Choose Write
Tap your blank NFC tag
Wait for confirmation
Common user issue:
If it shows “Encrypted” or reads very little data, that’s normal for secure cards.
Section 2: RFID (125 kHz) – Read older style key fobs/tags
What you can realistically do:
Read low-frequency RFID tags
Identify tag format
Save it for reference
Hardware add-ons needed:
None for reading
Optional: blank compatible RFID tags (only for your own systems and where permitted)
Step-by-step: Read an RFID tag
Open RFID
Choose Read
Press the RFID fob/tag against the back of the Flipper
Hold still for 2–5 seconds
Save if required
Common user issue:
Many “cards” are actually NFC, not RFID. If RFID fails, try NFC.
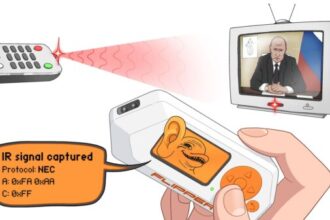
Section 3: Sub-GHz – Scan and analyse supported wireless remotes/sensors
What you can realistically do:
Detect Sub-GHz transmissions
Identify frequency and signal behaviour
Capture signals from supported devices you own
Understand rolling code vs fixed code
Hardware add-ons needed:
None for basic scanning
Optional: external antenna modules (advanced users only—often not needed for beginners)
Step-by-step: Scan for a remote/sensor signal
Open Sub-GHz
Choose Scan / Read
Press a button on your remote (5–20 cm from Flipper)
Watch for detected frequency and signal type
Save only if it’s supported and allowed
Step-by-step: Troubleshoot when “nothing is detected”
Check region settings
Disable power saving
Replace remote battery
Move away from interference (cars/metal walls)
Important reality check:
Rolling-code and encrypted systems will not replay. That’s expected.
Section 4: Infrared (IR) – Control TVs and appliances (easy wins)
What you can realistically do:
Read IR remotes
Save IR commands
Use Flipper as a universal remote for your own devices
Hardware add-ons needed: none
Step-by-step: Read an IR remote
Open Infrared
Choose Learn / Read
Point remote at Flipper’s IR receiver
Press a button
Save the command (or save as a remote profile)
Step-by-step: Use the Flipper to control a device
Open Infrared
Go to Saved
Select your saved remote/commands
Press OK to transmit
Common user issue:
Bright sunlight can ruin IR learning. Test indoors.
Section 5: Bluetooth (BLE) – Broadcast detection and awareness
What you can realistically do:
Detect BLE broadcasts
See device advertisements and signal strength
Understand what devices “announce” themselves nearby
Hardware add-ons needed: none
Step-by-step: Scan for BLE broadcasts
Open Bluetooth
Select Scan
Wait 10–30 seconds
View broadcast list and signal strength
Important limitation:
Flipper does not pair with your headphones or watch. It detects broadcasts only.
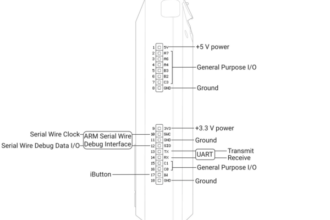
Section 6: GPIO – Hardware learning and simple electronics
What you can realistically do:
Interface with basic sensors
Trigger simple circuits (low power)
Learn electronics and prototyping
Hardware add-ons needed:
Jumper wires
Breadboard
Basic components (LEDs, resistors, sensors)
Optional: beginner kits (recommended)
Step-by-step: Basic GPIO “first project” (safe)
Open GPIO / Tools
Select a simple test mode (depending on installed tools)
Connect an LED + resistor to appropriate pins (only low voltage)
Toggle output to see the LED respond
Safety note:
GPIO is not for mains voltage or high-power devices.
Section 7: App Hub – Install tools safely
What you can realistically do:
Install apps and utilities
Keep tools updated
Expand learning features
Hardware add-ons needed: none
Step-by-step: Install an app
Open Flipper mobile app
Go to App Hub
Find an app
Install and sync to the Flipper
Tip:
Install only a few apps at a time to avoid confusion.
Section 8: Wi-Fi Dev Board (Optional add-on) – Diagnostics and learning
What you can realistically do:
Wi-Fi environment diagnostics
Channel congestion awareness
Some firmware management features
IoT broadcast observation (limited)
Hardware add-ons needed:
Wi-Fi Dev Board (ESP32-based board designed for Flipper)
Step-by-step: Connect the Wi-Fi Dev Board
Power off Flipper
Attach the board to GPIO pins correctly
Power on
Open relevant GPIO/Dev Board menu
Update Dev Board firmware if prompted
Common user issue:
If it doesn’t show up, reseat the board and update both firmwares.
Important limitation:
It does not hack Wi-Fi or extract passwords.
Section 9: Files – Manage your saved scans and installs
What you can realistically do:
View and organise saved items
Delete old captures
Keep storage tidy
Hardware add-ons needed: none
Step-by-step: Clean up files
Open Files
Review saved NFC/RFID/IR/Sub-GHz
Delete anything you don’t need
Keep naming consistent for easy reuse
Quick Add-On Checklist (What Most People Actually Need)
If you want the best experience as a beginner:
A protective case (you already did this post)
A small set of NTAG NFC tags (for safe learning/automation)
A basic breadboard + jumper wire kit (for GPIO learning)
Optional: Wi-Fi Dev Board (only if you want Wi-Fi environment diagnostics)
Most users do not need external antennas or advanced RF accessories.